5-Gallon Bucket Hydroponic System: DIY Bubble Bucket Build
Build a 5-gallon bucket hydroponic system (DWC bubble bucket) for under $30: parts list, air pump sizing by the gallon, build steps, and what to grow first.
In this guide
5-gallon bucket hydroponic systems are everywhere on TikTok and Pinterest right now, and for once the hype holds up. It’s the cheapest real way into hydroponics: one bucket, an air pump, and under $30 in parts from a hardware store. Most tutorials floating around online skip the one part that actually matters, though.
Skimp on oxygen and the plant stalls, or the roots rot before you get a harvest. Here’s the exact parts list, the air pump math most guides get wrong, and what to actually grow first.
Some links in this article may be affiliate links. We earn a small commission if you purchase through them, at no extra cost to you.
The short version
- A 5-gallon bucket DWC ("bubble bucket") system costs about $30 in parts and takes under an hour to build.
- Standard DWC crops are leafy greens and herbs. Tomatoes and other heavy feeders work, but they're the occasional use, not the default.
- An undersized air pump is the #1 build mistake. Size for roughly 1 LPM per gallon of solution, then buy a little more than that minimum.
- Dissolved oxygen below about 4 ppm stalls root growth. A pump and air stone keep a single bucket comfortably clear of that.
What Is a 5-Gallon Bucket Hydroponic System?
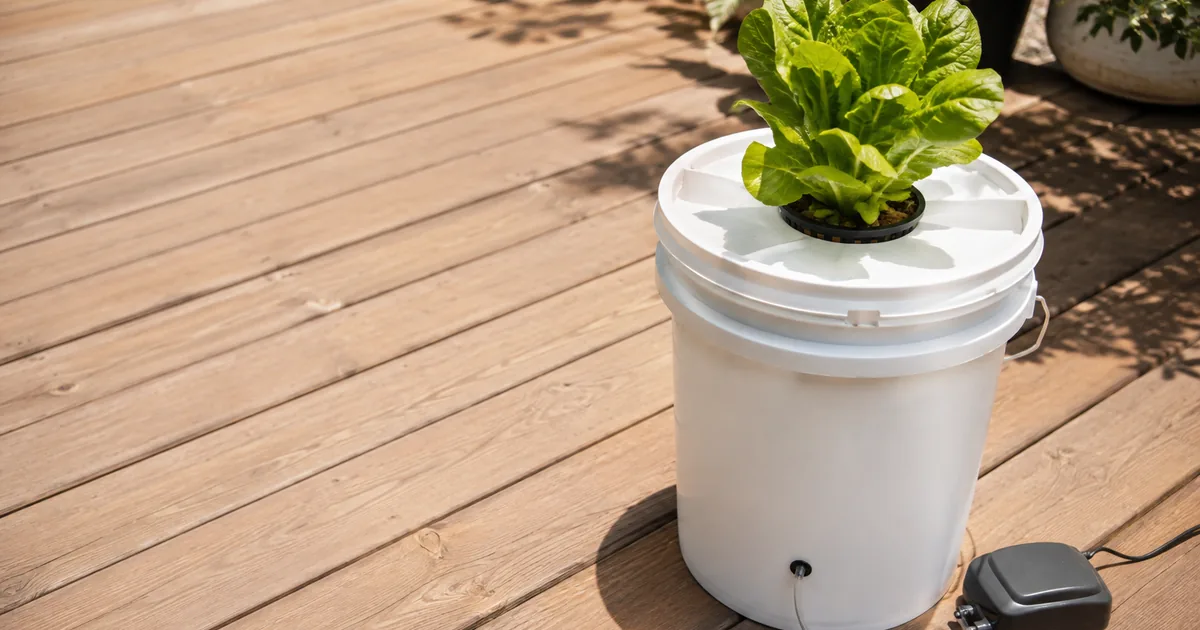
A 5-gallon bucket hydroponic system is a single-bucket deep water culture (DWC) setup, often called a “bubble bucket.” It suspends plant roots directly in an aerated nutrient solution, held in place by a net pot in the lid. An air pump and submerged air stone keep the water oxygenated around the clock.
That’s different from the passive Kratky method, which skips the pump entirely and relies on a shrinking air gap as the plant drinks the reservoir down. A bubble bucket grows faster because the roots never run short on oxygen, but it needs power and it needs the pump sized right.
Both approaches beat soil on water use by a wide margin. Recirculating and closed hydroponic systems use up to 90% less water than soil growing, since none of it evaporates into open ground or runs off past the root zone.
What You’ll Need (Parts List, Under $30)
A complete bubble bucket costs about $30 in parts, all available at a hardware store or online. Stick to food-grade, opaque containers: clear or light-colored plastic lets light reach the reservoir and grows algae fast.
| Part | What to Look For | Cost |
|---|---|---|
| 5-gallon bucket | Food-grade HDPE (resin code 2), opaque black or dark grey | $4.50 |
| Snap-on lid | Matching size, tight seal | $2.00 |
| Net pot (6-inch) | Rimmed mesh basket sized for the lid hole | $3.50 |
| Air pump | Aquarium diaphragm pump, 5-15 LPM output | $8.00 |
| Air stone | 2-inch cylinder or disc diffuser | $2.50 |
| Airline tubing | 3/16-inch silicone, about 6 feet | $2.00 |
| Check valve | Inline, stops water from siphoning back into the pump | $1.00 |
| Growing medium | Expanded clay pebbles (LECA), 1-2 liters | $3.00 |
| Hydroponic nutrients | Complete water-soluble N-P-K formula | $3.00 |
| Total | ~$29.50 |
How to Build It
- Cut the lid. Trace or hole-saw a circle in the center of the lid sized to seat your net pot flush, with the rim resting on top rather than falling through.
- Route the air line. Drill a small hole through the lid or the bucket wall, about an inch above the max water line, and thread the airline tubing through it.
- Connect the pump. Attach the air stone to the inside end of the tubing and set it at the bottom of the bucket. Add an inline check valve on the outside end before it reaches the pump, this stops water from siphoning back if the power cuts out.
- Mix the reservoir. Fill with about 4 gallons of water, leaving a few inches of headspace. Mix nutrients to your target EC and adjust pH into the 5.5 to 6.5 range.
- Plant it. Set a rooted seedling in the net pot, pack clay pebbles around the stem to hold it and block light, then snap the lid on so the bottom half-inch of the net pot touches the water.
Sizing Your Air Pump and Air Stone
Most failed bubble buckets trace back to one thing: an undersized air pump. Hydroponics suppliers commonly recommend roughly 1 liter per minute (LPM) of air output per gallon of solution, so a 5-gallon bucket needs at least 4 to 5 LPM. It’s worth buying 20 to 30% more capacity than that minimum, since you can always throttle a pump down but never push it past its ceiling.
The reason this matters is dissolved oxygen (DO). Growth slows once DO drops below about 4 ppm, with visible stress showing up around 3 ppm. A pump and air stone in a small bucket won’t reach the 7 to 8 ppm that commercial growers hit with pure oxygen injection, but it’s enough to keep a single bucket well clear of the danger zone.
Low oxygen at the roots is also what sets up root rot, which is why this is the one spec worth over-buying.
| Setup | Solution Volume | Air Pump Output |
|---|---|---|
| Single 5-gallon bucket | ~4 gallons | 5-15 LPM |
| 4-bucket shared manifold | ~16 gallons | 20-40 LPM |
What to Grow in a 5-Gallon Bucket
Leafy greens and herbs are the standard crop for a DWC bucket. Most growers stick to low-growing greens and culinary herbs, like lettuce, spinach, kale, basil, cilantro, mint, and parsley, and treat fruiting crops as an occasional use rather than the default. One bucket comfortably fits 2 to 3 of these at once with a multi-hole lid.
Tomatoes, peppers, and cucumbers do grow in a single bucket, and it’s a popular DIY project. Just expect to run one plant per bucket instead of several, since a heavy feeder’s root system will fill the whole reservoir on its own.
For exact EC targets by growth stage, see our hydroponic tomato guide or pH and nutrients for beginners for greens and herbs. Want the fastest first harvest instead? Start with something off our fastest-growing hydroponic crops list.
Keeping It Running (Maintenance and Common Mistakes)
A 5-gallon bucket needs a full water change every 7 to 14 days, not just a top-off. Topping off only replaces water lost to evaporation. It doesn’t reset the nutrients your plant already pulled out, and stretching past that window invites root-zone decay.
Keep roughly half the root mass submerged and half hanging in the humid air gap above the waterline. Fully submerging the whole root system starves it of the atmospheric oxygen it also needs.
And if your bucket lets any light through, wrap it in foil tape or opaque paint. Light-exposed reservoirs grow algae fast, and algae competes with your plant for both oxygen and nutrients. Our algae prevention guide covers the fix if it’s already started, and our reservoir maintenance guide has the full change-and-clean routine.
Do I need an air pump, or can I skip it?
Skipping the pump turns this into a Kratky setup instead of DWC, a passive method that relies on a shrinking air gap rather than active aeration. It still works, but it grows slower and suits small leafy greens better than heavy fruiting crops.
Can I use tap water?
Yes, if you let it sit uncovered for 24 hours first so chlorine and chloramine off-gas, or use a dechlorinator instead. If your tap water’s baseline EC is above about 0.3 to 0.5 mS/cm, subtract that from your target EC when mixing nutrients.
How many plants fit in one 5-gallon bucket?
One heavy feeder like a tomato or pepper per bucket, or 2 to 3 leafy greens and herbs using a lid modified with multiple smaller net pots. Crowding the roots of large plants in a reservoir this size stunts growth for all of them.
How often do I need to change the water?
Every 7 to 14 days for a full drain, clean, and refill. Top off with plain water in between to replace what evaporates, but that’s not a substitute: plants deplete nutrients unevenly, and the leftover ratio drifts out of balance over time.
A 5-gallon bucket hydroponic system comes down to three things: size the air pump right, pick a bucket that blocks light, and change the reservoir on schedule. Get those three right and this $30 build outperforms most beginner kits twice its price.
Start with a leafy green or herb for your first run since they’re the best-supported crop for this method, then graduate to a heavy feeder once you’ve got the routine down. And if roots ever turn brown or slimy, here’s how to fix it before it spreads.
Sources (5)
- Nelson, Langellotto & Nackley, “Hydro hints: Deep water culture” (EM 9455), Oregon State University Extension Service, May 2025, retrieved 2026-08-02, https://extension.oregonstate.edu/catalog/pub/em-9455-hydro-hints-deep-water-culture
- Mullins et al., “Hydroponic Production of Edible Crops: Deep Water Culture (DWC) Systems” (SPES-464), Virginia Cooperative Extension, July 2023, retrieved 2026-08-02, https://www.pubs.ext.vt.edu/content/pubs_ext_vt_edu/en/SPES/spes-464/spes-464.html
- Cornell University Controlled Environment Agriculture Program, “Cornell CEA Lettuce Handbook,” 2013, retrieved 2026-08-02, https://cpb-us-e1.wpmucdn.com/blogs.cornell.edu/dist/8/8824/files/2019/06/Cornell-CEA-Lettuce-Handbook-.pdf
- University of Arizona CEA Center, retrieved 2026-08-02, https://ceac.arizona.edu/
- University of Minnesota Extension, “Small-scale hydroponics,” retrieved 2026-08-02, https://extension.umn.edu/how/small-scale-hydroponics